What is UPIGateway – Merchant Connect?
UPIGateway – Merchant Connect is a platform that provides a QR code generation service to merchants, allowing them to accept UPI payments with zero transaction fees. Merchants can connect their UPI merchant account with UPIGateway and generate a unique QR code for their business. Customers can then scan the QR code with their UPI-enabled mobile app and make payments directly to the merchant’s UPI account. UPIGateway verifies the payment and sends an instant callback to your portal via webhook.
API Integration Process
Step 1: UPI Merchant Account
To use Upigateway, you need to have a merchant account from any of the providers listed below, which you can connect with Upigateway. This will enable you to accept payments using the QR code generated by Upigateway.


Contents
Step 2: Connect UPI Merchant Account
Connect your UPI merchant account with upigateway to start accepting payments through upigateway’s QR code.
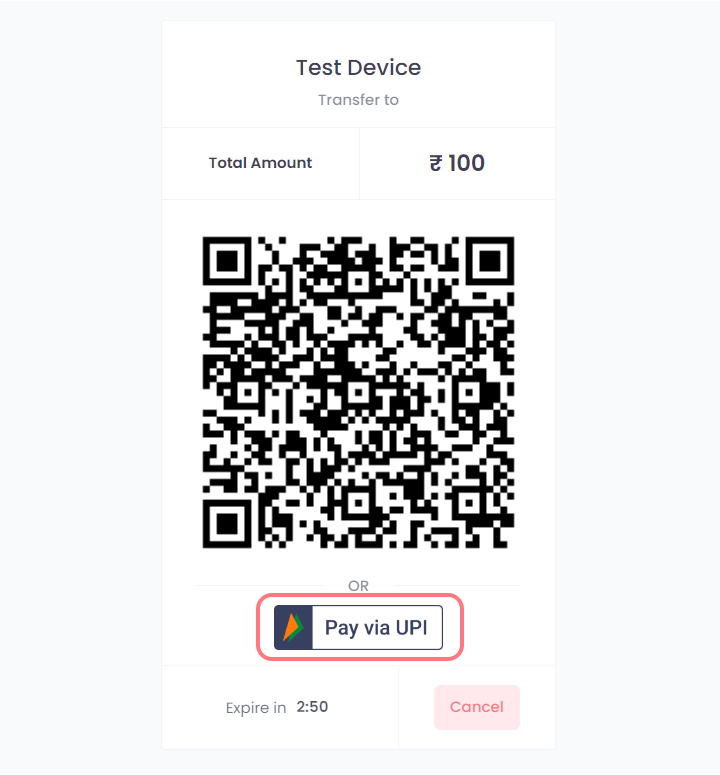
Step 3: Generate a QR code for accepting payments
After successfully connecting your UPI merchant account with Upigateway, you can accept payments on your portal by hitting the payment order request on the Upigateway using the API provided below :
Create Payment Order Request
https://merchant.upigateway.com/api/create_orderPost Data (JSON)
{
  "key": "xxxxxxxx-xxxx-xxxx-xxxx-xxxxxxxxxxxx",
  "client_txn_id": "1234567890",
  "amount": "100",
  "p_info": "Product Name",
  "customer_name": "Jon Doe",
  "customer_email": "jondoe@gmail.com",
  "customer_mobile": "9876543210",
  "redirect_url": "http://google.com",
  "udf1": "user defined field 1 (max 25 char)",
  "udf2": "user defined field 2 (max 25 char)",
  "udf3": "user defined field 3 (max 25 char)"
}
Please set callback for your order update. Redirect URL in post data is use for redirecting user after payment page.
Success Response
{
  "status": true,
  "msg": "Order Created",
  "data": {
    "order_id": 500041,
    "payment_url": "https://merchant.upigateway.com/gateway/pay/016befb77b00e5de6cbf32902b147d5a",
    "upi_intent": {
      "bhim_link": "upi://pay?pa=... (available only in enterprise plan)",
      "phonepe_link": "phonepe://pay?pa=... (available only in enterprise plan)",
      "paytm_link": "paytmmp://pay?pa=... (available only in enterprise plan)",
      "gpay_link": "tez://upi/pay?pa=... (available only in enterprise plan)"
    }
  }
}
Fail Response
{
  "status": false,
  "msg": "Your Plan Already Expired"
}
Step 4: Check Created Order Status
After successfully creating the payment order, it is necessary to check the status of the order. For this, please use the “Check Order Status” code provided below :
Check Order Status ✅
https://merchant.upigateway.com/api/check_order_statusAPI is Rate limited to 500 req/min.
Post Data (JSON)
{
  "key": "xxxxxxxx-xxxx-xxxx-xxxx-xxxxxxxxxxxx",
  "client_txn_id": "3df12988091",
  "txn_date": "27-02-2022"
}
Success Response
{
  "status": true,
  "msg": "Transaction found",
  "data": {
    "id": 66,
    "customer_vpa": "",
    "amount": 100,
    "client_txn_id": "abcd1234",
    "customer_name": "Jon Doe",
    "customer_email": "jondoe@gmail.com",
    "customer_mobile": "9876543210",
    "p_info": "Product Name",
    "upi_txn_id": "209876543210",
    "status": "success",
    "remark": "transaction successful",
    "udf1": "",
    "udf2": "",
    "udf3": "",
    "redirect_url": "http://google.com",
    "txnAt": "2022-01-15",
    "createdAt": "2022-01-15T14:43:30.000Z",
    "Merchant": {
      "name": "Merchant Name",
      "upi_id": "Q1234XXXX@ybl"
    }
  }
}
Fail Response
{
  "status": false,
  "msg": "Record not found",
  "data": {}
}
Step 5: Set Webhook
To automatically receive the response for the order status, set up a webhook.
E-commerce Plugin
Integrate UPI Gateway service with your portal effortlessly using our provided plugins and SDKs.
Woocommerce Plugin
Description
UPIgateway has developed a Woocommerce plugin that allows you to seamlessly integrate our UPI Gateway service with your Woocommerce store. By using this plugin, you can easily accept UPI payments using QR service from your customers without any hassle.How to Install
Goto WordPress Admin > Plugins > Add New > Upload the plugin zip fileHow to Setup
1. Goto WordPress Admin > Woocommerce > Settings > Payments
2. Enable UPIGateway as Payment Method
3. Payments > UPIGateway Settings > Set API Key
4. UPIGateway Settings > Copy Webhook URL > Update in a UPIGateway
PHP Sample code
index.php
<!DOCTYPE html>
<html>

<head>
	<title>UPI Gateway - Payment Test Demo</title>
	<meta charset="utf-8">
	<meta name="viewport" content="width=device-width, initial-scale=1">
	<link rel="stylesheet" href="https://maxcdn.bootstrapcdn.com/bootstrap/4.5.2/css/bootstrap.min.css">
</head>

<body>
	<div class="container p-5">
		<div class="row">
			<div class="col-md-7 mb-2">
				<?php
				if (isset($_POST['payment'])) {
					$key = "";	// Your Api Token https://merchant.upigateway.com/user/api_credentials
					$post_data = new stdClass();
					$post_data->key = $key;
					$post_data->client_txn_id = (string) rand(100000, 999999); // you can use this field to store order id;
					$post_data->amount = $_POST['txnAmount'];
					$post_data->p_info = "product_name";
					$post_data->customer_name = $_POST['customerName'];
					$post_data->customer_email = $_POST['customerEmail'];
					$post_data->customer_mobile = $_POST['customerMobile'];
					$post_data->redirect_url = "https://yourdomain.com/redirect_page.php"; // automatically ?client_txn_id=xxxxxx&txn_id=xxxxx will be added on redirect_url
					$post_data->udf1 = "extradata";
					$post_data->udf2 = "extradata";
					$post_data->udf3 = "extradata";

					$curl = curl_init();
					curl_setopt_array($curl, array(
						CURLOPT_URL => 'https://merchant.upigateway.com/api/create_order',
						CURLOPT_RETURNTRANSFER => true,
						CURLOPT_ENCODING => '',
						CURLOPT_MAXREDIRS => 10,
						CURLOPT_TIMEOUT => 30,
						CURLOPT_FOLLOWLOCATION => true,
						CURLOPT_HTTP_VERSION => CURL_HTTP_VERSION_1_1,
						CURLOPT_CUSTOMREQUEST => 'POST',
						CURLOPT_POSTFIELDS => json_encode($post_data),
						CURLOPT_HTTPHEADER => array(
							'Content-Type: application/json'
						),
					));
					$response = curl_exec($curl);
					curl_close($curl);

					$result = json_decode($response, true);
					if ($result['status'] == true) {
						echo '<script>location.href="' . $result['data']['payment_url'] . '"</script>';
						exit();
					}

					echo '<div class="alert alert-danger">' . $result['msg'] . '</div>';
				}
				?>
				<h2>Test Demo</h2>
				<span>Fill Payment Detail and Pay</span>
				<hr>
				<form action="" method="post">
					<h4>Txn Amount:</h4>
					<input type="text" name="txnAmount" value="1" class="form-control" placeholder="Enter Txn Amount" readonly><br>
					<h4>Customer Name:</h4>
					<input type="text" name="customerName" placeholder="Enter Customer Name" class="form-control" required><br>
					<h4>Customer Mobile:</h4>
					<input type="text" name="customerMobile" placeholder="Enter Customer Mobile" maxlength="10" class="form-control" required><br>
					<h4>Customer Email:</h4>
					<input type="email" name="customerEmail" placeholder="Enter Customer Email" class="form-control" required><br>
					<input type="submit" name="payment" value="Payment" class="btn btn-primary">
				</form>
			</div>
		</div>

	</div>
</body>

</html>
redirect_page.php
<?php
error_reporting(E_ERROR | E_PARSE);

$echo = "";
if (isset($_GET['client_txn_id'])) {
	$key = "";	// Your Api Token https://merchant.upigateway.com/user/api_credentials
	$post_data = new stdClass();
	$post_data->key = $key;
	$post_data->client_txn_id = $_GET['client_txn_id']; // you will get client_txn_id in GET Method
	$post_data->txn_date = date("d-m-Y"); // date of transaction

	$curl = curl_init();
	curl_setopt_array($curl, array(
		CURLOPT_URL => 'https://merchant.upigateway.com/api/check_order_status',
		CURLOPT_RETURNTRANSFER => true,
		CURLOPT_ENCODING => '',
		CURLOPT_MAXREDIRS => 10,
		CURLOPT_TIMEOUT => 30,
		CURLOPT_FOLLOWLOCATION => true,
		CURLOPT_HTTP_VERSION => CURL_HTTP_VERSION_1_1,
		CURLOPT_CUSTOMREQUEST => 'POST',
		CURLOPT_POSTFIELDS => json_encode($post_data),
		CURLOPT_HTTPHEADER => array(
			'Content-Type: application/json'
		),
	));
	$response = curl_exec($curl);
	curl_close($curl);

	$result = json_decode($response, true);
	if ($result['status'] == true) {
		// Txn Status = 'created', 'scanning', 'success','failure'

		if ($result['data']['status'] == 'success') {
			$echo = '<div class="alert alert-danger"> Transaction Status : Success</div>';
			$txn_data = $result['data'];
			// All the Process you want to do after successfull payment
			// Please also check the txn is already success in your database.
		}
		$txn_data = $result['data'];
		$echo = '<div class="alert alert-danger"> Transaction Status : ' . $result['data']['status'] . '</div>';
	}
}
?>
<!DOCTYPE html>
<html>

<head>
	<title>Payment Gateway - Test Response</title>
	<meta charset="utf-8">
	<meta name="viewport" content="width=device-width, initial-scale=1">
	<link rel="stylesheet" href="https://maxcdn.bootstrapcdn.com/bootstrap/4.5.2/css/bootstrap.min.css">
</head>

<body>
	<div class="container p-5">
		<div class="row">
			<div class="col-md-8 mb-2">
				<h2>Response</h2>
				<p>Payment Gateway - Test Response</p>
				<?php echo $echo;
				 // show table of response
				 if (isset($txn_data)) {
					echo '<table class="table table-bordered">
					<thead>
					  <tr>
						<th>Key</th>
						<th>Value</th>
					  </tr>
					</thead>
					<tbody>';
					foreach ($txn_data as $key => $value) {
						echo '<tr>
						<td>' . $key . '</td>
						<td>' . @$value . '</td>
					  </tr>';
					}
					echo '</tbody>
				  </table>';
				 }
				?>

			</div>
		</div>

	</div>
</body>

</html>
callback.php
<?php

// This is the callback file which will be called after payment is done directly from UPI gateway server.
// you can set the webhook url at https://merchant.upigateway.com/user/api_credentials
// You can also use IP check to prevent unauthorized access.
// $ip = $_SERVER['REMOTE_ADDR'];
// if($ip != '101.53.134.70'){
// 	die('Unauthorized Access');
// }

if(isset($_POST['id']) && $_POST['client_txn_id']){
	$id = $_POST['id']; // upi gateway transaction id
	$customer_vpa = $_POST['customer_vpa']; // upi id from which payment is made
	$amount = $_POST['amount']; // 1
	$client_txn_id = $_POST['client_txn_id']; // client_txn_id set while creating order
	$customer_name = $_POST['customer_name']; //
	$customer_email = $_POST['customer_email']; //
	$customer_mobile = $_POST['customer_mobile']; //
	$p_info = $_POST['p_info']; // p_info set while creating order
	$upi_txn_id = $_POST['upi_txn_id']; // UTR or Merchant App Transaction ID
	$status = $_POST['status']; // failure
	$remark = $_POST['remark']; // Remark of Transaction
	$udf1 = $_POST['udf1']; // user defined data added while creating order
	$udf2 = $_POST['udf2']; // user defined data added while creating order
	$udf3 = $_POST['udf3']; // user defined data added while creating order
	$redirect_url = $_POST['redirect_url']; // redirect_url added while creating order
	$txnAt = $_POST['txnAt']; // 2023-05-11 date of transaction
	$createdAt = $_POST['createdAt']; // 2023-05-11T12%3A15%3A23.000Z

	if($_POST['status']){
		echo "Transaction Successful";
		// All the Process you want to do after successfull payment
		// Please also check the txn is already success in your database.
	}

	if($_POST['status'] == 'failure'){
		echo "Transaction Failed";
	}
}
?>ok
Contain table:
- SBI CSP – How to register sbi csp
- Fino Payment Bank CSP Lite Login
- Fino Payment Bank CSP Login
- how to apply fino payment bank csp
- BOB CSP Browser Settings
- BOB Kiosk Banking, BOB CSP, BC Commission chart 2021-22
- CSC Registration
- VLE Eshram payment and recovery details
- Digipay lite id password kasie banaye
- Business Correspondents – कौन बन सकता है? – Axis Bank Through CSC
- IIBF Exam Registration
- Digipay Micro Atm Booking Order Start
- CSC VLE Insurance Training And Certification
- IRCTC Ticket Booking through CSC
- ekyc pan apply
Following my social platform
| Web | www.mytechtrips.com |
| Join telegram channel | Click here |
| Join WhatsApp group | Click here |
| Click here | |
| Click here | |
| Youtube Channel 1 | Click here |
| Youtube Channel 2 | Click here |
