GST is a tax system implemented by the government of India which requires businesses to register and pay taxes on their sales. The registration process for GST in India is simple and straightforward. You can do it online, without any hassle. In this article, we will discuss the steps you need to take to register for GST in India online. We will also look at some of the key benefits of registering for GST, as well as some tips on how to make the process easier and more efficient.
The Goods and Services Tax (GST) is a comprehensive tax levied on the supply of goods and services in India. It has been introduced to replace multiple taxes levied by the Central and State Governments, making it easier for businesses to pay their taxes.
For businesses in India, registering for GST is a mandatory requirement. If you are starting a business or already running one, you must register for GST if your annual turnover exceeds Rs 40 lakhs (Rs 20 lakhs in some states). In this article, we will discuss how to register for GST India online. We will also discuss the documents required and the steps involved in registering for GST.
The Goods and Services Tax (GST) is a comprehensive tax system implemented in India to simplify the taxation process. It is important for businesses to register for GST in order to comply with the law and avail of certain benefits. Registering for GST online is a simple process that can be done in a few steps. In this article, we will discuss the steps involved in registering for GST India online.
How to Register for GST India Online – Guide for GST Registration Process Online
The GST Registration process is online based and must be carried out on the government website gst.gov.in. Every dealer whose annual turnover exceeds Rs.20 lakh (Rs.40 lakh or Rs.10 lakh, as may vary depending upon state and kind of supplies) has to register for GST.
Steps to fill up Part-A of GST Registration Application
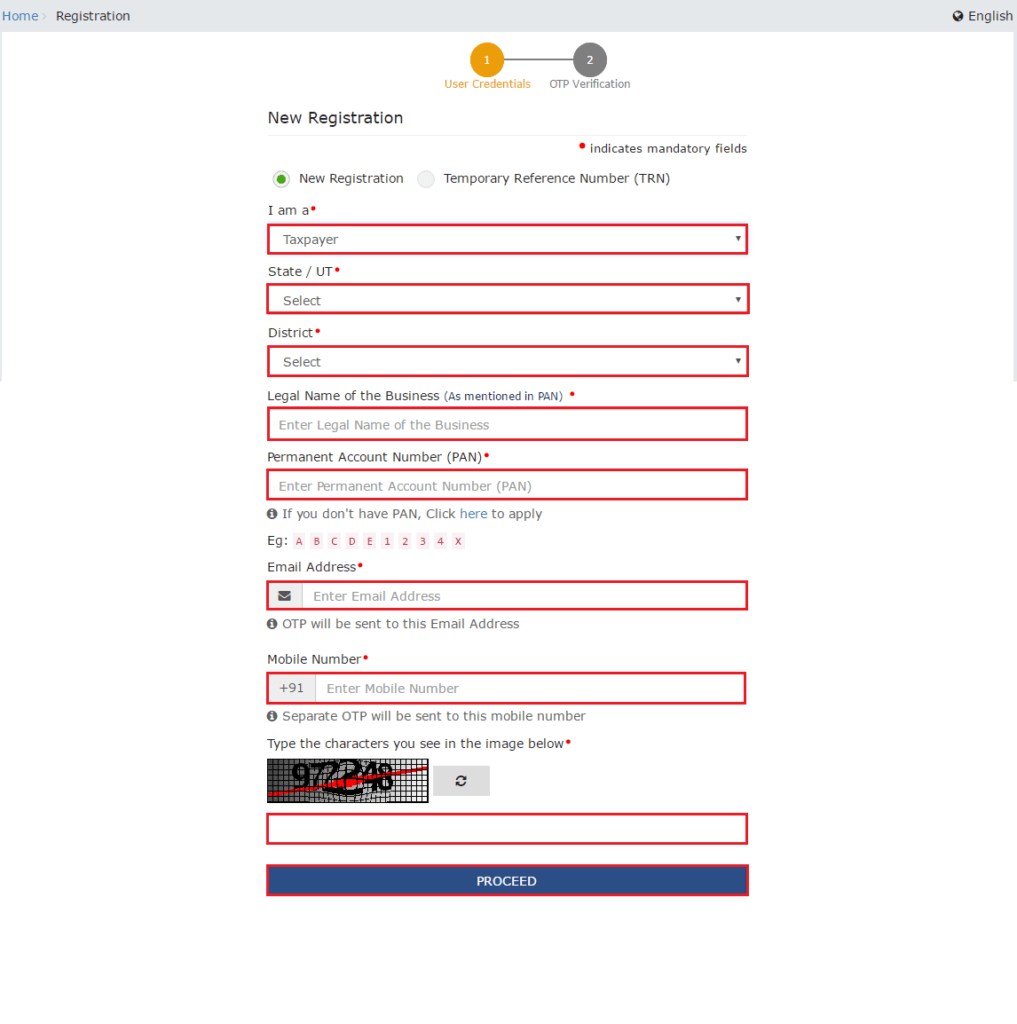
Step 1 – Go to GST portal. Click on Services. Then, click on the ‘Registration’ tab and thereafter, select ‘New Registration’.

Step 2 – Enter the following details in Part A –
- Select the New Registration radio button
- In the drop-down under ‘I am a’ – select Taxpayer
- Select State and District from the drop-down
- Enter the Name of the Business and PAN of the business
- Key in the Email Address and Mobile Number. Please note that you don’t have to enter your email id and mobile number if your contact details are linked with PAN.
- You will receive OTPs on the registered email id and mobile number or PAN-linked contact details, as the case may be.
- Click on Proceed
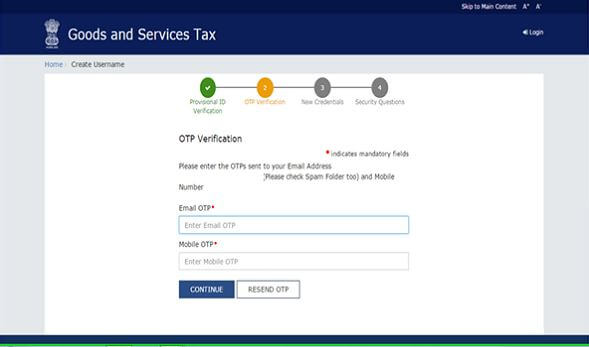
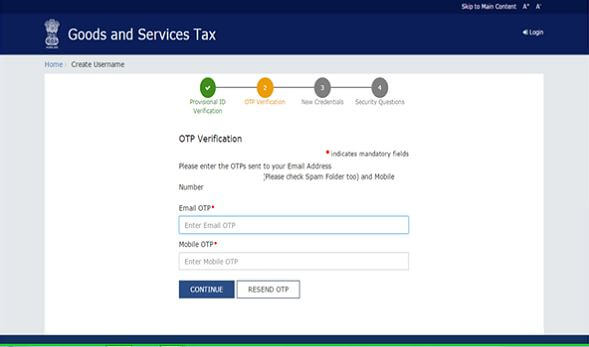
Step 3 – Enter the two OTPs received on the email and mobile or the PAN-linked contact details. Click on Continue. If you have not received the OTP click on Resend OTP.
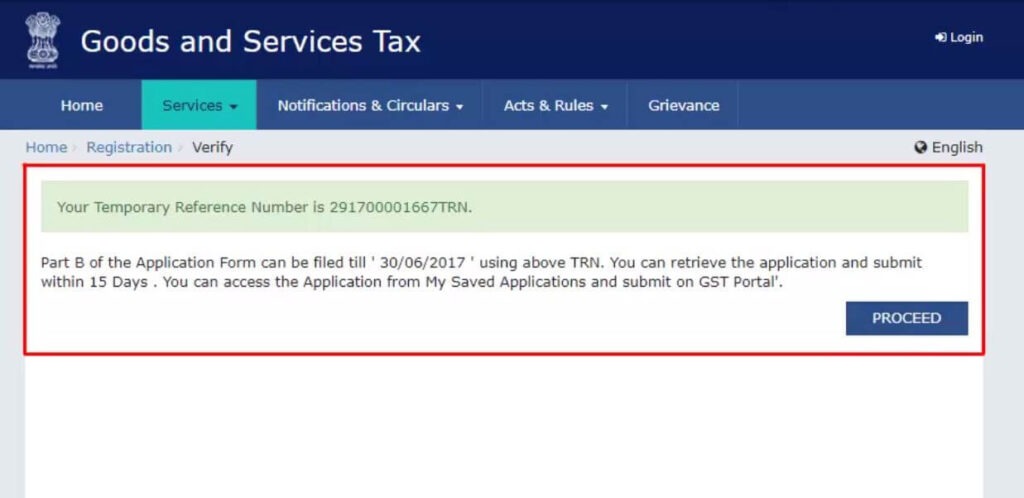
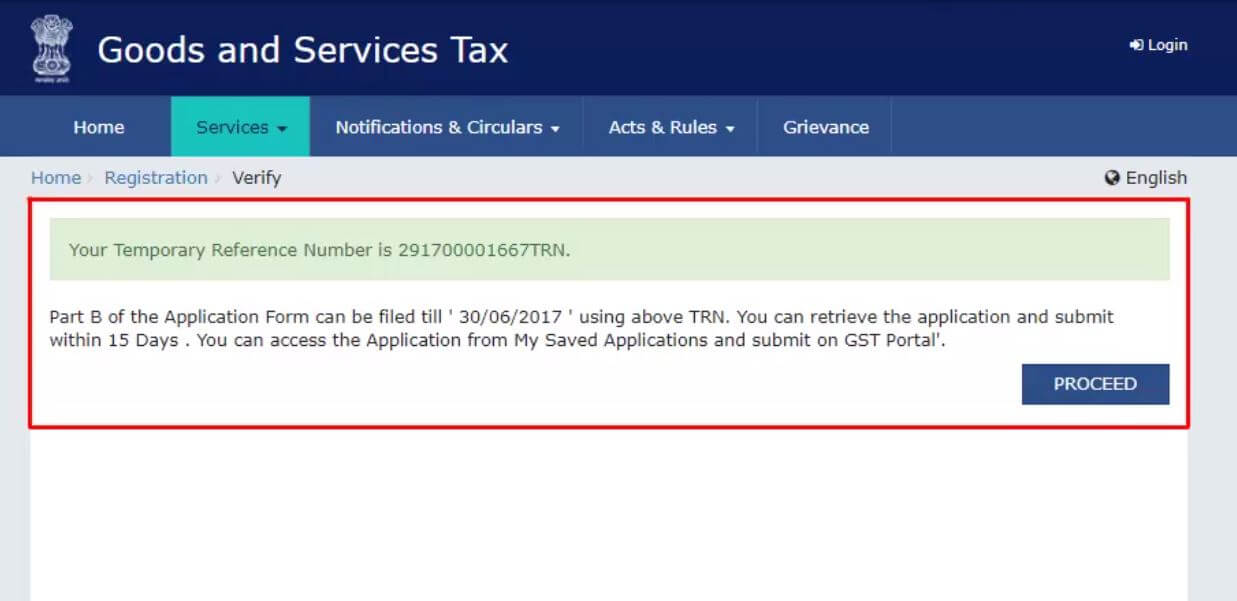
Step 4 – You will receive the 15-digit Temporary Reference Number (TRN) now. This will also be sent to your email and mobile or PAN-linked contact details. Note down the TRN. You need to complete filling the part-B details within the next 15 days.
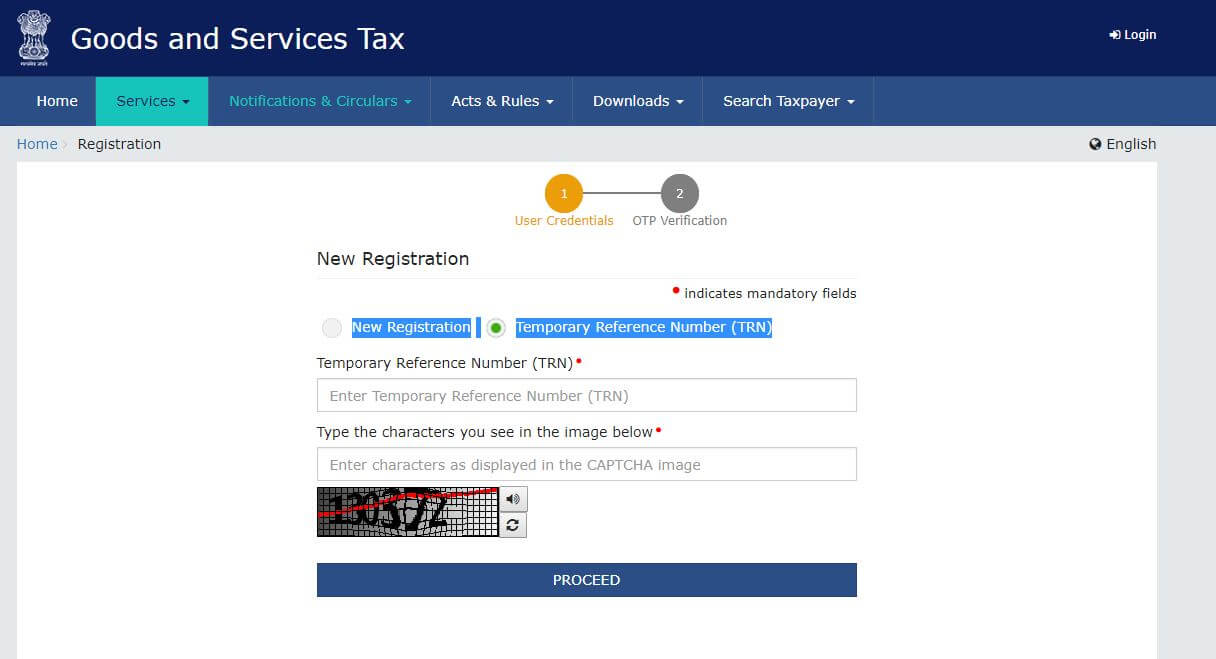
Step 5 – Once again go to the GST portal. Select the ‘New Registration’ tab.
Step 6 – Select Temporary Reference Number (TRN). Enter the TRN and the captcha code and click on Proceed.
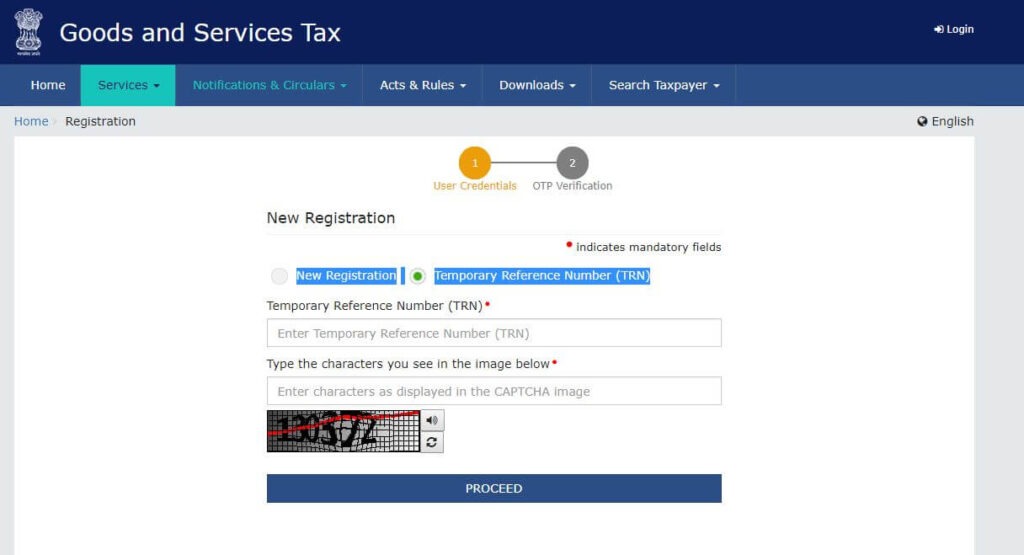
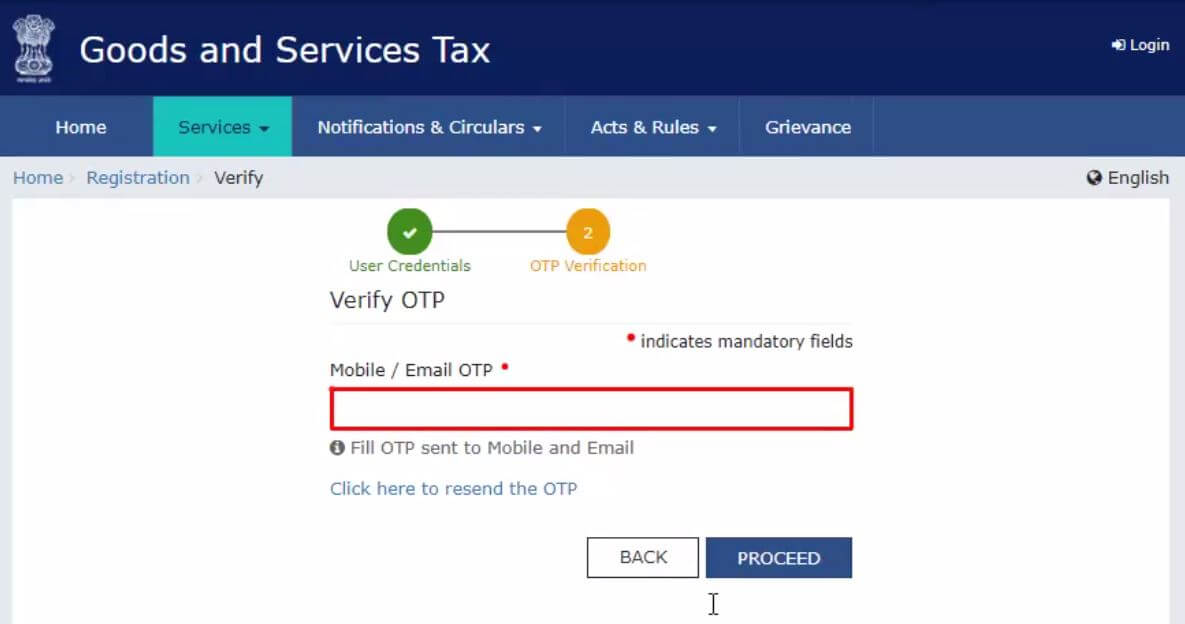
Step 7 – You will receive an OTP on the registered mobile and email or PAN-linked contact details. Enter the OTP and click on Proceed
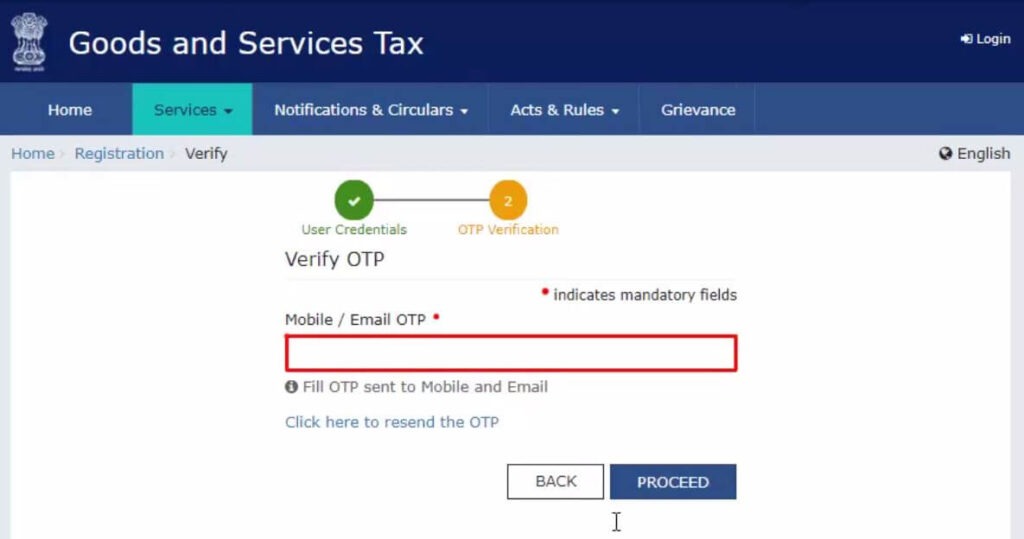
Step 8 –You will see that the status of the application is shown as drafts. Click on Edit Icon.
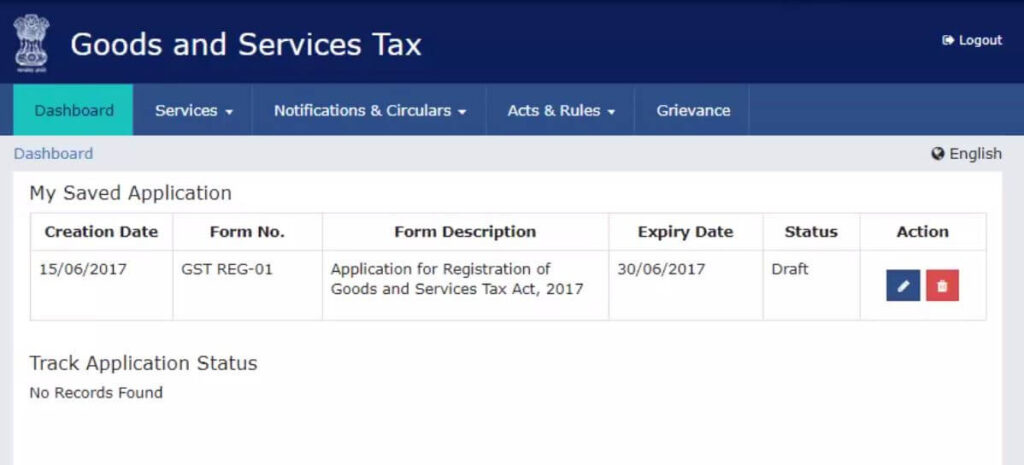
Steps to fill Part-B of GST registration application
Step 9 – Part B has 10 sections. Fill in all the details and submit appropriate documents. The Aadhaar authentication section was added and the bank account section was made non-mandatory in 2020.

Here is the list of documents you need to keep handy while applying for GST registration-
- Photographs
- Constitution of the taxpayer
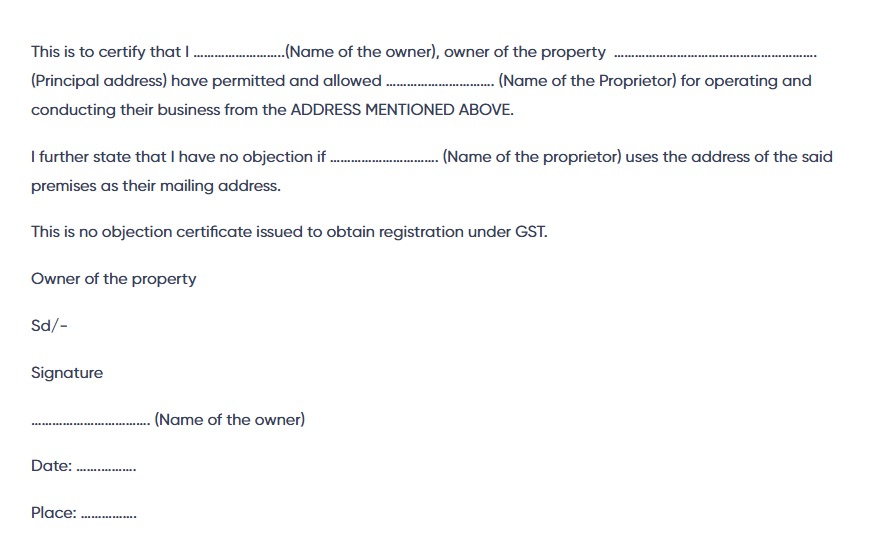
- Proof for the place of business
- Bank account details*
- Verification and aadhaar authentication, if chosen
How to Register for GST India Online – Guide for GST Registration process Online
GST Registration process is online based and must be carried out on the government website gst.gov.in. Every dealer whose annual turnover exceeds Rs.20 lakh (Rs.40 lakh or Rs.10 lakh, as may vary depending upon state and kind of supplies) has to register for GST.
Here is a step-by-step guide on how to complete the registration process online on the GST Portal–
Steps to fill up Part-A of GST Registration Application
Step 1 – Go to GST portal. Click on Services. Then, click on the ‘Registration’ tab and thereafter, select ‘New Registration’.

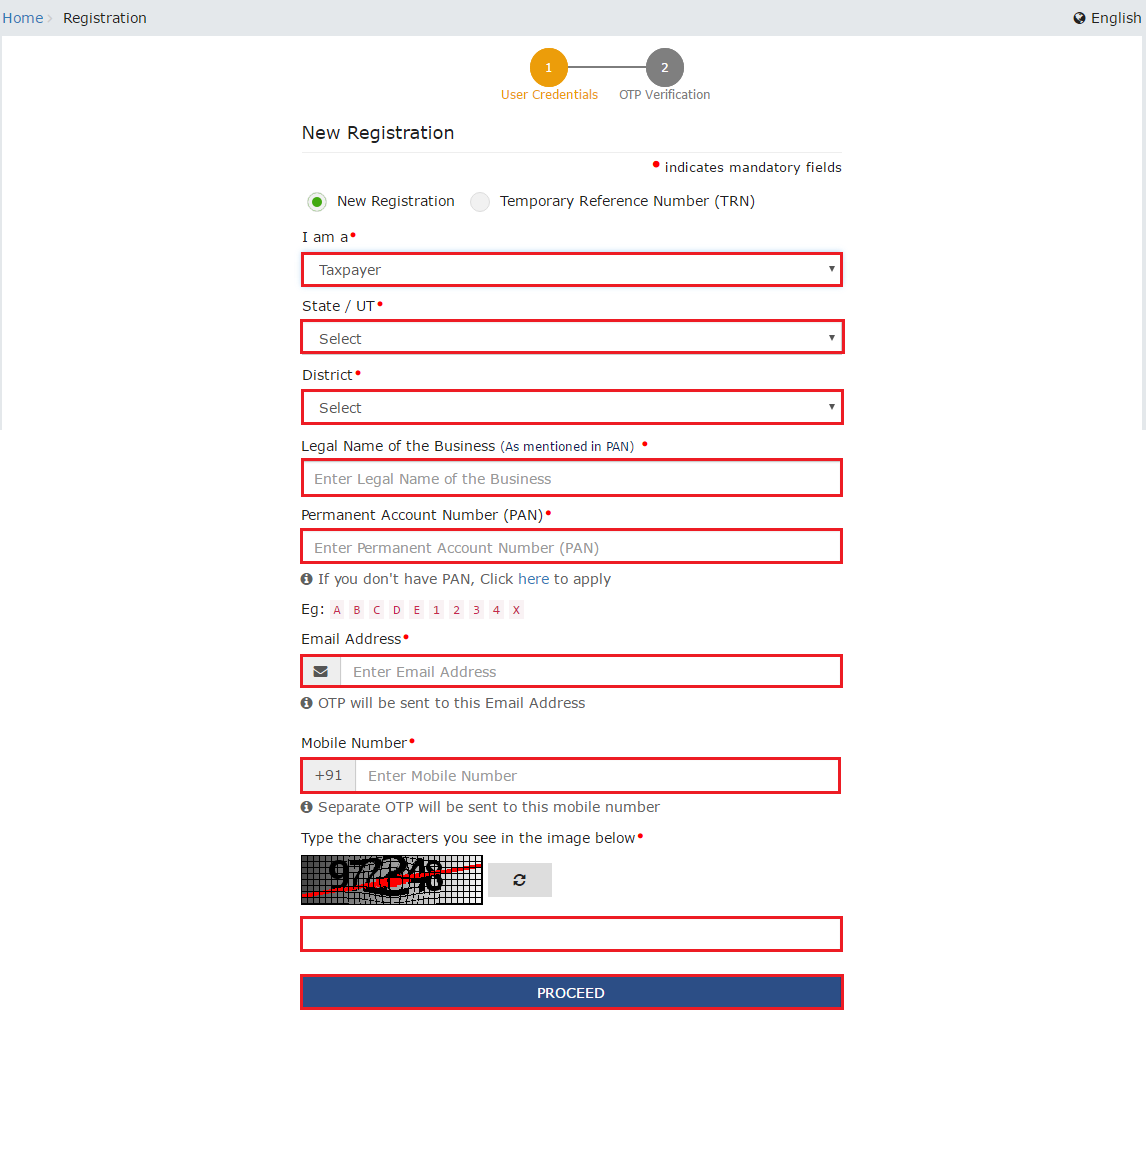
Step 2 – Enter the following details in Part A –
- Select the New Registration radio button
- In the drop-down under ‘I am a’ – select Taxpayer
- Select State and District from the drop-down
- Enter the Name of the Business and PAN of the business
- Key in the Email Address and Mobile Number. Please note that you don’t have to enter your email id and mobile number if your contact details are linked with PAN.
- You will receive OTPs on the registered email id and mobile number or PAN-linked contact details, as the case may be.
- Click on Proceed
Step 3 – Enter the two OTPs received on the email and mobile or the PAN-linked contact details. Click on Continue. If you have not received the OTP click on Resend OTP.
Step 4 – You will receive the 15-digit Temporary Reference Number (TRN) now. This will also be sent to your email and mobile or PAN-linked contact details. Note down the TRN. You need to complete filling the part-B details within the next 15 days.
Step 5 – Once again go to the GST portal. Select the ‘New Registration’ tab.
Step 6 – Select a Temporary Reference Number (TRN). Enter the TRN and the captcha code and click on Proceed.
Step 7 – You will receive an OTP on the registered mobile and email or PAN-linked contact details. Enter the OTP and click on Proceed
Step 8 –You will see that the status of the application is shown as drafts. Click on Edit Icon.
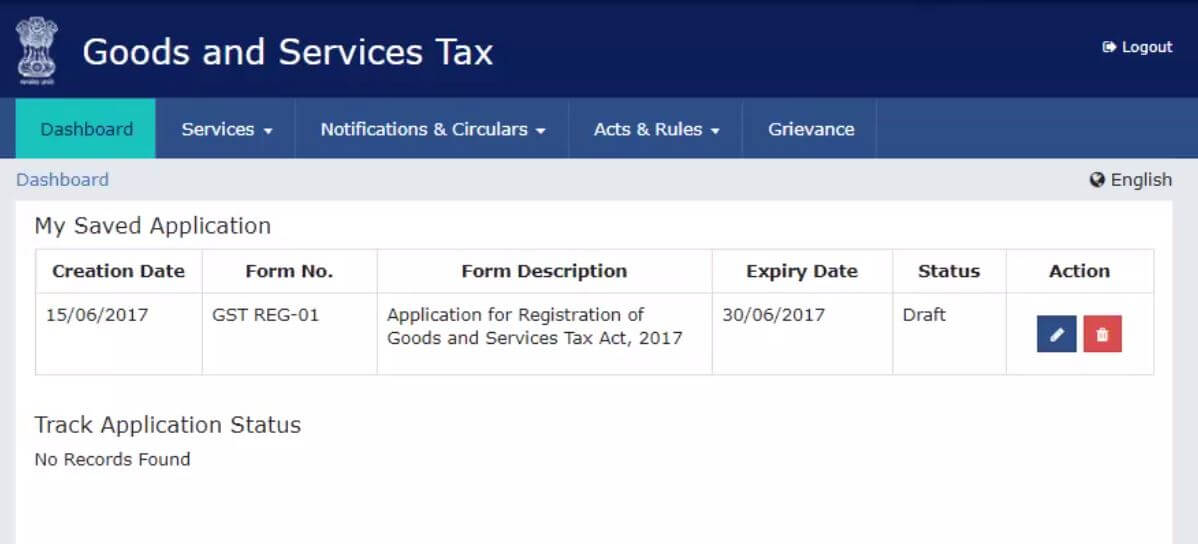
Steps to fill Part-B of the GST registration application
Step 9 – Part B has 10 sections. Fill in all the details and submit the appropriate documents. The Aadhaar authentication section was added and the bank account section was made non-mandatory in 2020.

Here is the list of documents you need to keep handy while applying for GST registration-
- Photographs
- Constitution of the taxpayer
- Proof of the place of business
- Bank account details*
- Verification and aadhaar authentication, if chosen
* Bank account details are non-mandatory at the time of GST registration since 27th December 2018.
For more information about the documents required for GST registration, watch our video:
Step 10 – Under the Business Details section, enter the trade name, business constitution, and district.
Note: The trade name is completely different from the legal name of the business.
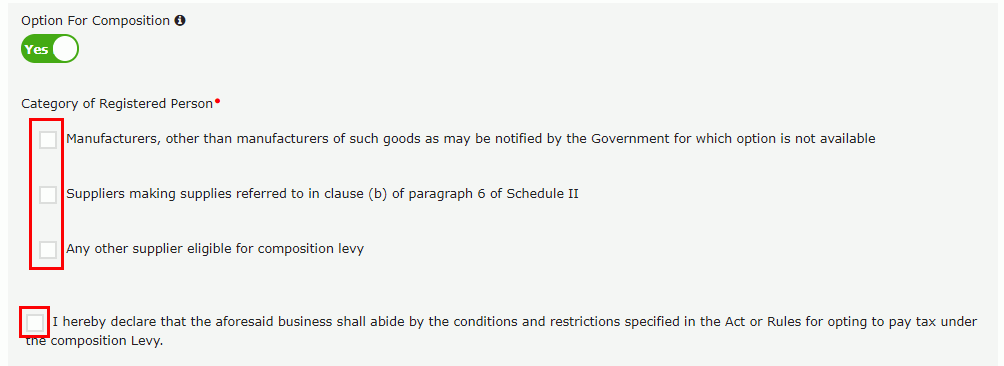
Moving on, select ‘Yes/No’ to opt in or out of the composition scheme, against the field- “Option for Composition”. Further, choose the type of registered person as manufacturers or service providers of work contracts or any other person eligible for the composition scheme.
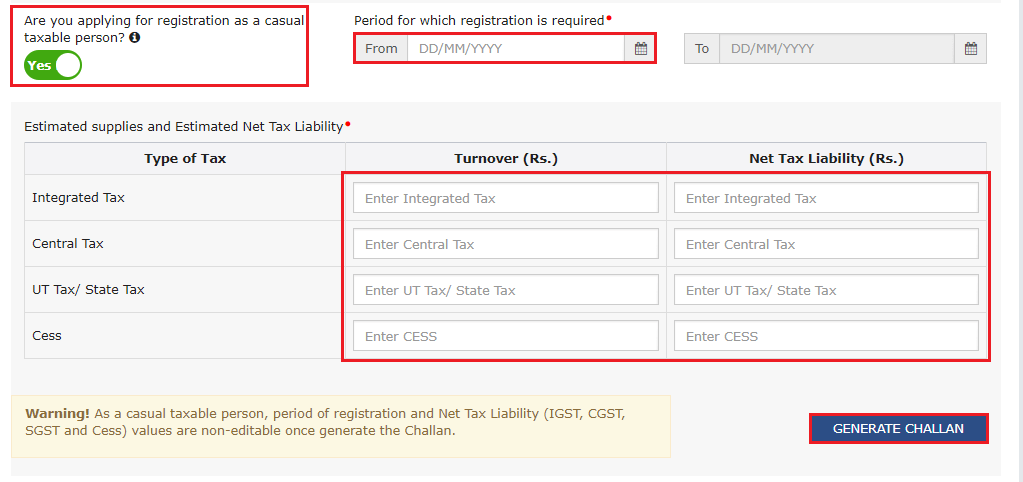
Next up, enter the date of commencement of business and the date from which liability arises. Also, select ‘Yes/No’ for the type of registration as a casual taxable person and if ‘Yes’ is chosen, then generate the challan by entering the details for advance tax payment as per the GST law for casual taxable persons.
Further, under the ‘Reason to obtain registration, select the reason as ‘Input service distributor’ if that is the case, at this stage. Alternatively, many other options are available to choose from.
Based on the selection made, enter details in the fields that appear. For example, if you select ‘SEZ unit’, then enter the name of the SEZ, designation of approving authority, approval order number, etc., and upload the supporting documents.
In the Indicate Existing Registrations section, choose the type of existing registration such as Central Sales Tax, Excise or Service Tax, registration number, and date of registration. Thereafter, click the ‘Add’ button.
Following my social platform
| Web | www.mytechtrips.com |
| Join telegram channel | Click here |
| Join WhatsApp group | Click here |
| Click here | |
| Click here | |
| Youtube Channel 1 | Click here |
| Youtube Channel 2 | Click here |


