
If you want to disable the Windows antivirus, you can follow these general steps:
- Open the Windows Security app: You can do this by clicking on the Start menu and searching for “Windows Security” or by clicking on the shield-shaped icon in the notification area of the taskbar.
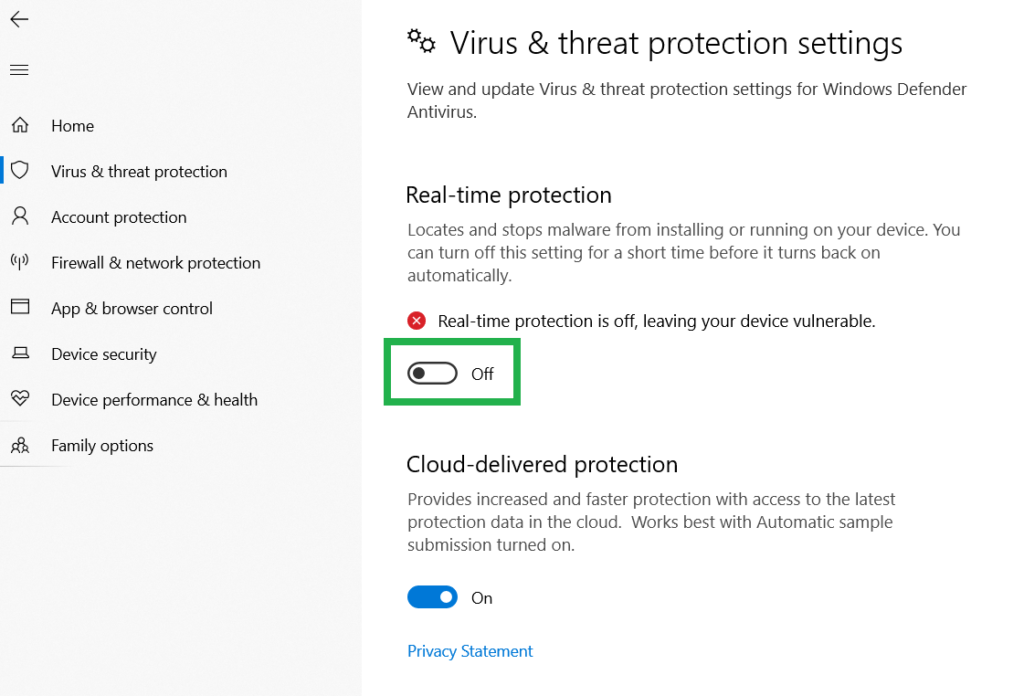
- Access the Virus & threat protection settings: In the Windows Security app, click on “Virus & threat protection” in the left-hand menu.
- Disable real-time protection: Under the Virus & threat protection settings, you should see an option for “Real-time protection.” Click on the toggle switch next to it to turn it off. This will disable the real-time scanning feature of Windows antivirus.
Please note that disabling your antivirus protection can leave your computer vulnerable to malware and other security threats. It is generally recommended to keep your antivirus software enabled for optimal protection. If you need to disable it temporarily for a specific reason, make sure to re-enable it as soon as possible.
It’s also important to mention that the exact steps may vary depending on the version of Windows you are using. These instructions are based on Windows 10, but similar options should be available in other versions of Windows as well.
Understanding Windows Antivirus: A Built-In Security Solution for Windows Operating Systems
Windows Antivirus refers to the built-in antivirus software provided by Microsoft for Windows operating systems. It is commonly known as “Windows Defender Antivirus” and is included in Windows 10 and Windows 11.
Windows Antivirus, or Windows Defender Antivirus, is designed to protect your computer from various types of malware, including viruses, spyware, ransomware, and other malicious software. It provides real-time scanning of files, web browsing protection, and automatic updates to ensure the latest threat definitions are in place.
Windows Antivirus runs in the background and monitors your system for any suspicious or malicious activities. If it detects a threat, it takes action to quarantine or remove the malicious files.
Over the years, Windows Defender Antivirus has evolved and improved in terms of detection capabilities and performance. It has become a reliable and effective security solution for many Windows users. However, some users may choose to use third-party antivirus software for additional features or personal preferences.
It’s worth noting that the specific features and functionality of Windows Antivirus may vary depending on the version of Windows you are using. Microsoft regularly updates and enhances Windows Defender Antivirus to address new threats and security challenges.
To disable the antivirus on Windows 10, you can follow these steps:
- Open the Windows Security app: Click on the Start menu and search for “Windows Security” or click on the shield-shaped icon in the notification area of the taskbar.
- Access the Virus & threat protection settings: In the Windows Security app, click on “Virus & threat protection” in the left-hand menu.
- Disable real-time protection: Under the Virus & threat protection settings, locate the “Real-time protection” option and click on it.
- Turn off real-time protection: On the Real-time protection page, you’ll see a toggle switch. Click on the switch to turn it off. A warning prompt will appear asking you to confirm your action. Select “Yes” to disable real-time protection.
Please note that disabling your antivirus protection can leave your computer vulnerable to malware and other security threats. It is generally recommended to keep your antivirus software enabled for optimal protection. If you need to disable it temporarily for a specific reason, make sure to re-enable it as soon as possible.
Remember that these instructions are specifically for Windows 10. If you are using a different version of Windows, the steps may vary slightly.
In Windows 11, the default antivirus program is called “Windows Defender Antivirus.” To disable it, you can follow these steps:
- Open the Windows Security app: Click on the Start menu and search for “Windows Security” or click on the shield-shaped icon in the notification area of the taskbar.
- Access the Virus & threat protection settings: In the Windows Security app, click on “Virus & threat protection” in the left-hand menu.
- Turn off real-time protection: Under the Virus & threat protection settings, you’ll find the “Real-time protection” option. Click on it.
- Disable real-time protection: On the Real-time protection page, you’ll see a toggle switch. Click on the switch to turn it off. A warning prompt will appear asking you to confirm your action. Select “Yes” to disable real-time protection.
Please keep in mind that disabling your antivirus protection can leave your computer vulnerable to malware and other security threats. It is generally recommended to keep your antivirus software enabled for optimal protection. If you need to disable it temporarily for a specific reason, make sure to re-enable it as soon as possible.
These instructions are specifically for Windows 11. If you are using a different version of Windows, the steps may differ slightly.
table contains:
- CSC RAP Exam Questions And Answers 2023 PDF
- Business Correspondents – कौन बन सकता है? – Axis Bank Through CSC
- LAUNCH OF GOVERNMENT SALARY AND CURRENT ACCOUNT WITH SMARTHUB OPPORTUNITIES THROUGH CSC
- CSC VLE Insurance Training And Certification
- How To Apply For HDFC Bank CSC VLE || HDFC Bank Mitra || HDFC BC Point || HDFC CSP कैसे खोले
- IRCTC Ticket Booking through CSC
- LPG Gas Distributorship Registration Start Through CSC
- The Ultimate Guide to UTI PSA Online Registration: UTI PAN Card Login!
- UPIGateway
- DigiPay v7.3
Following my social platform
| Web | www.mytechtrips.com |
| Join telegram channel | Click here |
| Join WhatsApp group | Click here |
| Click here | |
| Click here | |
| Youtube Channel 1 | Click here |
| Youtube Channel 2 | Click here |
